Thursday 13 November 2014

Red Velvet Cake


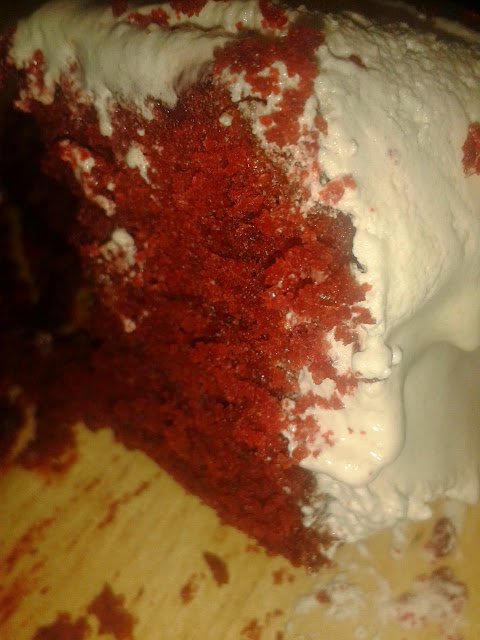
'This delicious treat has layers of vampy red cake contrasting with snowy white frosting.  The result is quite spectactular, both to look at and to eat.  A journalist once wrote in The New York Times that this is the Dolly Parton of cakes - rich and tacky, but much loved all the same!'
Rachel Allen, 'Bake', p57

And now for something completely different... before this, I hadn't even eaten Red Velvet Cake, let alone made one.  But that's what this project is all about!  I wasn't sure what to expect, but it really does have an unusual, literally 'velvety' texture.  And I loved the slight crunchiness of the frosting with all that soft sponge.

Well, last month we had a ladies social event at church.  It was our first one - the men had been out for a meal so we thought it was our turn!  It went really well - we played some silly games (which not everyone quite understood, making them even more silly!)  And we ate cake!  Jenny, our minister's wife, had very kindly organised the evening... and asked everyone to bring a pudding.  Which meant  a large array of treats! I decided the Red Velvet would be perfect for a girlie get-together.  It went down really well, although there was plenty left due to stiff competition! Therefore, it came out again on Sunday, at coffee time after the service.  I took no responsibility for the effect of all that food colouring on the kids! 

My friend Sonia made the comment that "it's very nice, but you have to wonder who thought of it?  I mean, why not blue velvet?!"  

Hmmm, good point!  Well, after some hunting around the internet, this seems to be the best explanation of its origins

http://mentalfloss.com/article/48990/how-red-velvet-cake-got-its-name

So, here goes with the recipe...

  • 150g (5oz) butter, softened
  • 300g (11oz) caster sugar
  • 1 tsp vanilla extract
  • 3 eggs, separated
  • 250g (9oz) plain flour
  • 25g (1oz) cornflour
  • 1 tsp baking powder
  • 2 level tbsp good quality cocoa powder
  • 250ml (9 fl oz) buttermilk
  • Red food colouring (use 2 tbsp liquid colour or 1/2 tsp thick red food paste) *
  • Pinch of salt
  • 1 tsp white wine vinegar
  • 1 tsp bicarbonate of soda


For the frosting
  • 2 large egg whites **
  • 250g (9oz) caster sugar
  • 50g (2oz) golden syrup
  • Pinch of salt
  • 1/4 tsp cream of tartar
  • 2 tbsp water
  • 1 tsp vanilla extract


  • 2 x 23cm (9in) diameter sandwich tins, each about 5cm (2in) deep

Method
  1. Preheat the oven to 180C/ 350F/ GM4.  Butter and flour the sides of the cake tins, and, Iine the bases with parchment paper.
  2. Cream the butter in a large bowl or electric food mixer, until soft.  Add the sugar and beat until the mixture is pale and fluffy.  Add the vanilla extract and egg yolks, one by one, beating after each addition.
  3. Place the flour, cornflour, baking powder and cocoa powder in a sieve resting in a plate.  Measure the buttermilk with the food colouring and mix together.  It should be very red, so add more if you need to.
  4. Sift one-third of the dry ingredients into the butter and eggs mixture until just combined, then pour in one-third of the buttermilk mixture and mix until just combined.  Continue, combining a third at a time, until both are incorporated.
  5. Whisk the egg whites and salt in a large, spotlessly clean bowl until stiffish peaks form.  Add one-quarter to the batter and mix.  Add the remaining egg whites in 3 stages, folding them in gently with a large metal spoon until just incorporated, leaving as much air in the egg whites as possible.
  6. In a small bowl, mix the vinegar and bicarbonate of soda until it bubbles up, then gently fold this in to the batter.  Quickly pour the batter into the prepared tins, and smooth the tops.  Bake in the oven for 25-30 minutes, or until a skewer inserted into the middle comes out clean, and the cake feels slightly springy on top.
  7. Leave in the tins for 15 minutes, then carefully remove the cakes from the tins, running a table knife or palette knife slowly around them, and invert onto a wire rack to cool.
  8. To make the frosting, place the egg whites; sugar; golden syrup; salt; cream of tartar and water in a heatproof bowl over a saucepan of simmering water (the base of the bowl should not touch the water).  Bring the water to a steady simmer.  With a hand-held electric beater or balloon whisk, whisk until you have shiny, satiny soft peaks.  Remove the bowl from the simmering water, and continue to whisk for a further 2 minutes - it will get a bit stiffer.  Whisk in the vanilla extract.
  9. Immediately ice the middle, top and sides of the cake with a palette knife, fluffing the frosting up to form little peaks all over the cake.  You need to work fast to ice the cake, as the icing sets very quickly.   Leave for at least 30 minutes, to allow a thin crust to form outside a creamy interior.
* Be warned, this cake uses a shocking amount of food colouring.  I initially bought a tube of red gel colouring, but after putting it all in, the cake was merely pale pink.  Quick trip to the shops to buy a bottle of liquid colouring, and about half a bottle later I had the right colour! I personally think it's worth it for a treat, however I recently came across this recipe from Bake-Off winner Jo Wheatley.

http://www.josblueaga.com/2012/04/raspberry-red-velvet.html 

She uses pureed raspberries to create the lovely red colour, so that's an alternative you might like to try. 

** I used the egg whites that I had frozen from my almond praline cake, a ccouple of posts back.

On a different subject,  I had a lovely surprise today.  If you've seen my baked cheesecake posts, you'll know that I addded some yoghurt from 'The Collective Dairy Company'.  Well, I thought I'd drop them an email with links to the recipes.  They mailed back to say how much they liked them, and asked for my postal address.  I've just received a lovely 'thank you' parcel with vouchers and an apron.  So kind, and totally unexpected! 


Wednesday 5 November 2014

Bonfire night cheesecake


Bit of an experiment here, but one which I'm really pleased with.  If you look back to July, I made Rachel's baked cheesecake, substituting a luxury yoghurt for some of the cream cheese.  It worked so well that I decided to try another variation.   Again, I had a really nice yoghurt from the 'Collective Dairy Company', this time spiced pumpkin flavour.  Perfect to try out for our bonfire party! I used 2 tubs of Philadelphia (360g) and then made up the remaining 90g with yoghurt.  As a finishing touch, I made up a portion of Rachel's toffee sauce, and spread this over the biscuit base.  I left it to cool and thicken a little before pouring over the cheesecake filling.

I was surprised at how much the toffee sauce bubbled up around the cheesecake filling.  It didn't look the neatest, but gave a lovely, slightly chewy crust, in contrast to the soft cheesecake filling.  Really chuffed with it, my experiments aren't usually so successful!

If you'd like Rachel's toffee sauce recipe, here it is.  Very simple, and keeps for ages in the fridge.  It's lovely with ice cream, sticky toffee pudding, waffles, etc etc.  Rachel's books also give salted caramel and boozy versions!

Simply take...

  • 110g (4oz) butter
  • 250g (9oz) soft light brown sugar, or half brown and half caster
  • 275g (10oz) golden syrup
  • 225ml (8 fl oz) double cream
  • 1/2 tsp vanilla extract


Place everything in a saucepan, over a high heat.  Boil for approximately 4-5 minutes, stirring regularly until thickened.

Easy peasy!

Almond Praline Cake


'This delicious cake has been made at Ballymaloe for many years.  It keeps very well, due to the large amount of nuts it contains and because the icing keeps the moisture in the cake.  It is ideal for a special tea party'
Rachel Allen, 'Bake', p65

Wow, this was amazing and I think, my favourite recipe so far from the book. It was also the most complicated, but well worth it.  I made it for a diamond wedding party, at which we were all asked to contribute a dessert. 60 years married, what an amazing achievement! Definitely warrants a special bake.  Not everything went to plan, but still my cake received plenty of compliments. Here goes with the recipe...

  • 225g (8oz) butter, softened
  • 225g (8oz) caster sugar
  • 4 eggs
  • 225g (8oz) plain flour
  • 1 tsp baking powder
  • 3 tbsp almond praline (see below)
  • 1 tbsp milk


For the praline
  • 250g (9oz) caster sugar
  • 250g (9oz) unskinned (unblanched) almonds


For the praline buttercream icing
  • 125mls (4fl oz) water
  • 350g (12oz) caster sugar
  • 7 egg yolks*
  • 350g (12oz) butter (preferably unsalted), softened
  • 1 tsp vanilla extract
  • 6 tbsp almond praline


  • Two 20cm (8in) diameter sandwich tins


  1. Preheat the oven to 180C/350F/GM4.  Butter and flour the sides of the tins, and line each base with parchment paper.
  2. To make the praline, place the sugar in a non-stick pan or medium saucepan with low sides, and scatter the nuts over.  Set over a low heat until the sugar turns a caramel colour.  Do not stir, but you may carefully 'swirl' the pan to allow the sugar to caramelise evenly.
  3. When the caramel has turned a deep whisky colour, pour the mixture onto a baking tray lined with parchment paper and allow to cool.  When the praline is cool and hard, place in a food processor and whizz to a gritty powder.  Alternatively, place the praline in a plastic bag and crush with a rolling pin **.
  4. To make the cake... Cream the butter in a large bowl or electric food mixture until soft.  Add the sugar, and beat until light and fluffy.  Add the eggs one by one, beating well between each addition.  Sift in the flour and baking powder, and stir in gradually.  Add 3 tbsp crushed praline and mix lightly, adding the milk to moisten.
  5. Divide equally between the 2 tins, and bake for 25-30 minutes, or until a skewer inserted into the centre of each cake comes away clean.  Allow to cool for a few minutes, before turning onto a wire rack.
  6. Meanwhile, make the buttercream icing.  In a low-sided medium saucepan, bring the water and sugar to the boil, stirring until the sugar dissolves.  Turn the heat up high, and let the syrup boil for 4-5 minutes, to the 'thread' stage, when the last few drops that fall from a metal spoon dipped into the syrup come off in one long, quite thick and syrupy thread ***.
  7. While the syrup is boiling, beat the egg yolks for 1 minute with an electric hand-held beater or an electric food mixer, then very gradually add the hot syrup.  Continue beating until all the syrup is added and the mixture has cooled.  The consistency should be stiff, mousse-like and able to hold a figure of eight pattern made by the beater ****.
  8. Place the softened butter in another bowl and beat well with a hand-held electric beater until very soft.  Continuing to beat, gradually add the mousse, a spoonfull at a time.  Then stir in the vanilla extract and 6 tbsp of the crushed praline.
  9. To assemble, slice each cake in half horizontally.  Spread the inside of each sparingly with butter icing and sandwich together, stacking each layer above the other as evenly as possible.  Brush all over the cake to remove any crumbs *****.
  10. Ice the top and sides with the remaining icing.  Sprinkle the remaining crushed praline all over, including the sides.

* As you'll see, this cake uses a lot of eggs - 4 whole and 7 yolks!  Luckily I got a big box from my old friend, Co-op bargain shelf!  I didn't have time to make anything with the spare whites, so I froze them. I put 2 at a time into small pots (the cube types you get for small portions of baby food). They froze really well, and I used some for my Red Velvet Cake... coming on the blog soon!

** This recipe made loads of praline, with plenty left over.  I've kept some in an airtight container, maybe to make another cake one day (although I have to admit to having a sneaky nibble now and again - the caramelised nuts are delicious!) Could make a nice party nibble :-)

*** Not sure what happened to my sugar syrup, but it just wouldn't get to the thread stage.  After boiling it for ages, I took the pan off the heat and the sugar immediately crystallised into a sticky ball.  I really didn't want to waste all that sugar, so just put in some tap water and boiled it again to dissolve the sugar.  There I left it, not attempting to get to the 'thread stage' again.  When I met Rachel, I asked her about this... she wasn't sure what had gone wrong.  However, on the same trip to Cheltenham I bought myself a sugar thermometer.  Looking forward to trying it out!

**** Another minor mishap here... I just couldn't get my mousse to the 'figure of eight' stage.  Maybe because the syrup hadn't thickened as it should.  So, the buttercream was thinner than it probably should have been.  Still, it tasted lovely, nobody knew the difference and I wasn't telling!

***** I don't think the cake rose as well as it should... again I'm not sure why but the cakes looked too thin to slice in half.  So, I left them whole and just sandwiched the 2.

This cake looked like a 'recipe for disaster' at a few stages.  However, I think it's a lesson in not giving up.  It was definitely worth persevering, and I'm looking forward to having another go.  By the way, the photo doesn't do it justice!